
| Web & Database Portfolio |
| Database Solutions |
| Custom Software |
| Software Products |
| Outsourcing Development |
| Case Studies |
| Technologies Used |
| Outsourcing News |
| Web & Software Development Resources |
ONLINE PROJECT Introduction The Online project management and tracking system is a way to keep track of the project on the web and be able to access it from anywhere in the world. You can also show status of your project to your clients and impress them by showing that you take extra care for them and completion on time is very important for you. You just need to buy one license as it is web-based unlike Microsoft Office Project 2003 where you need to buy license for each PC. Also all your employees can access the same server as it is web based and therefore avoid any data consistency problems. We can customize this product for your needs. The project management and tracking system is designed using Microsoft's latest .NET technology. This system divides each project into Milestones and Tasks and keeps track of the tasks completed and uses them to show the completion status of the Milestone and project. It has a time tracker for employees where they can put in their hours for a day spent on a project. It also has a Event List or Meeting manager where you enter appointments and check availability. Also all communication done for a project can be stored at one place using web forms which allows you upload files and emails people you can select from a list of people working on that project. One can run different types of reports for a project like variation reports which show difference between actual deadlines and estimated ones and actual hours and estimated hours. You can run reports to check completion status of projects in detail broken down to the status of a task. Also you can run expense reports, time reports for a project which will show you expenses and time spent by each employee and the total. You can also run expense and time reports for an employee which will show his expenses and time spent on each project and total. Click here to check the demo version Admin section Employee section Customer section
The purpose of this document is to give an overview of the Online Project Management System from user’s perspective. This document has been divided into sections: All the users of this system must login using a valid username and password. If you don’t have a username, then please contact the administrator for the same. Once you enter the correct username and password, the system will automatically redirect you to page depending on your rights. There are three different types of pages that are possible.
A. Administrator Section (Data Entry) This part of the report will explain the function of following links that you can follow from the left side navigation bar.
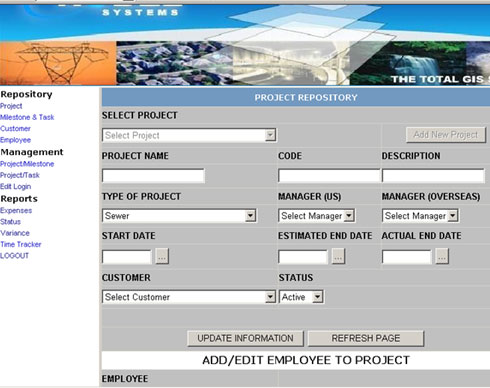
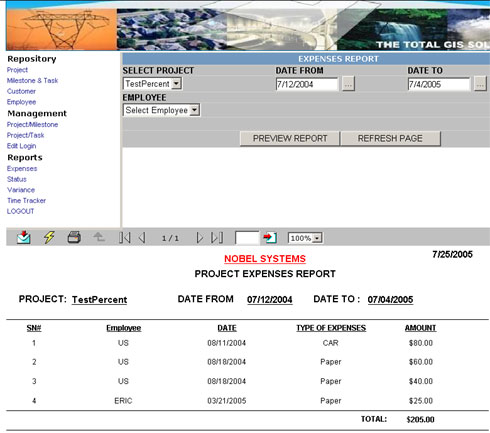
1. Project Project form is used to edit or create a new project and select employees for a project. 2. Milestone & Task This form can be used to add new milestones and task. This is a one-time entry only. All the tasks and milestones that are to be used in future must be entered here first in order to assign them to different projects. 3. Customer This form can be used to add new customers. This is a one-time entry only. All the customers that are to be used in future must be entered here first in order to assign them to different projects or to give them access rights. 4. Employee This form can be used to add new employee. This is a one-time entry only. All the employees that are to be used in future must be entered here first in order to assign them to different projects or to give them access rights. 5. Project/Milestone This form is used to insert milestone in a Project. Also, the weight of the milestone and the target hours that it will require are entered here. 6. Project/Task This form is used to insert the task in a Project. Also, the weight of the task and the target hours that it will require are entered here. 7. Edit Login This form is used to edit the username and password for the employees and the customers. Only one person, either employee or customer can be assigned username password at a given time. The administrator must select the name of the employee or the customer for whom the username/password has to be assigned. Administrator Section (Reports) General Crystal Report Functions Export: This function helps in exporting the report in different formats. The first icon (the letter one) is used to export the report. Pop Ups must be enabled to use this feature. The window that opens will display the different formats in which the report can be exported. Select the format and then click export. Print: The small printer icon can be used to print the report. The instructions are self explanatory in the wizard that pops up. Expenses ReportThis form generates the report of all the expenses. There are different ways in which the expenses report can be viewed/printed. All the expenses under given project: To view report, select the project from the dropdown menu. Select the date range from which to which the expenses have to be viewed. Select Employee should be left as it is. Clicking Preview Report will generate report.
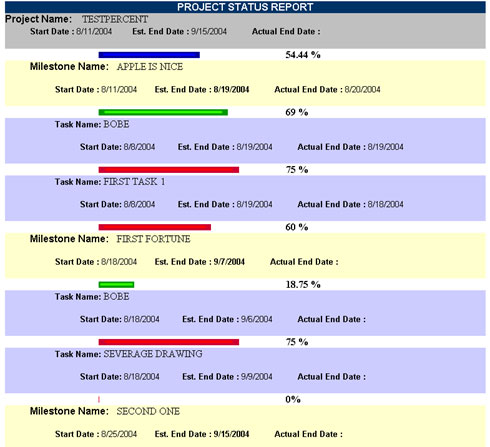
All the expenses done by an employee: To view report, select the employee from the dropdown menu. Select the date range from which to which the expenses have to be viewed. Select Project should be left as it is. Clicking Preview Report will generate report. Status Report This report shows status of all active projects . There are different ways in which the status report can be viewed/printed.
Variance Report This form generates the report of variance of projects . To print the report, select the project and click Preview Report. Time TrackerThis form generates the report of all the hours spent by employee on the project. There are different ways in which the expenses report can be viewed/printed. All the hours spent by employees under given project B. Employee Section (Data entry and Reports)
Time Tracker This form can be used by the employees to add the time they spent on each task. Expenses This form can be used by the employees to add the expenses. Project Upload/DownloadThis section can be used to upload and download files needed for a project. Email SystemThis system can be used to send emails to employees and customers belonging to a project. PAR SYSTEM (Problem and Resolution System)This system lets you create a new PAR and edit un-resolved and resolved PAR’s. New PAR Resolved PAR This page shows you the list of all PARS that have been resolved. In order to edit or view info on any resolved PAR, click the Resolved PAR link on the left navigation bar. Click on the more info link next to the PAR for which you want to view customer replies. Click on the edit button next to the PAR for which you want to edit information. Change the information and click the Save PAR button. Un-Resolved PAR This page helps you view the list of all PARS that are un- resolved. In order to edit or view info on any un-resolved PAR, click the Un-Resolved PAR link on the left navigation bar. Click on the more info link next to the PAR for which you want to view customer replies. Click on the edit button next to the PAR for which you want to edit information. Change the information in the fields desired. Click on the check box next to task resolved to allow it to show in the resolved PAR list and click the Save PAR button. Event ListThis form allows you to add or view the events. In order to add an event or view the events, click the Event list button on the left navigation bar. When you click the Event list link a calendar opens up for the current month. It will have certain dates highlighted with different colors each having its own significance. Dates will be marked in three different colors: green, light gray, dark gray. Green: When you click on the Date that is highlighted with a green color it will show information about the meeting for that day. Light Gray: The Date that is highlighted with light gray shows the current date of the month. Dark Gray: When you click on the Date that’s marked with dark gray color it shows the milestones for that day. ADD Meeting: In order to add an event, click on the Date you desire to have an event and then click on the Add Meeting link. Then click again on the Date you desire the meeting so that the color changes to blue for that date. Select the Project from the Project drop down, type the Description in the description text box. You can also enter Notes in the note text box if desired. Click on the Inform by email link to open the email window. Select the check box next to Employee and Customer name and click the select for email button. Click the save event button to save the event in the calendar. Time Tracker Report This form generates the report on time spent by the employee logged in. Expenses Report This form generates the report on expenses registered by the employee logged in.
C. Customer Section (Data entry and Reports) Customers will be able to login and will have access to Project Status and will be able to upload/download files. They will also be able to reply to PARs and send emails. Project Status To view report, select the project from the dropdown menu. A link will show up which says, “ Click here for web based report”. Clicking the link will open a new window with detailed status report of that project. Upload/Download FilesTo upload a new file, follow these steps: Project File Upload To > File Type > Notes > Browse and select the file > Upload file To download a file, follow these steps: Select Project > View/Download Files. This action will create a grid at the bottom of the page. Click on download to download the file and save/view it. PAR SYSTEMResolved PAR: This page shows you the list of all PARS that have been resolved. In order to view info on any resolved PAR, click the Resolved PAR link on the left navigation bar. Click on the more info link next to the PAR for which you want to view more information. On the page that shows more info you will see a link to reply to the PAR. Click on it to reply to this PAR. Type your reply in the message box. Use the Upload Attachment link to upload any attachments you have. Use the Inform by Email link to select employees who will receive the email. Then click the reply button. Un-Resolved PAR This page helps you view the list of all PARS that are un- resolved. In order to view info on any un-resolved PAR, click the Un-Resolved PAR link on the left navigation bar. Click on the more info link next to the PAR for which you want to view more information. On the page that shows more info you will see a link to reply to the PAR. Click on it to reply to this PAR. Type your reply in the message box. Use the Upload Attachment link to upload any attachments you have. Use the Inform by Email link to select employees who will receive the email. Then click the reply button. EVENT LISTThis form allows you to add or view the events. In order to add an event or view the events, click the Event list button on the left navigation bar. When you click the Event list link a calendar opens up for the current month. It will have certain dates highlighted with different colors each having its own significance. Dates will be marked in three different colors: green, light gray, dark gray. Green: When you click on the Date that is highlighted with a green color it will show information about the meeting for that day. Light Gray: The Date that is highlighted with light gray shows the current date of the month. Dark Gray: When you click on the Date that’s marked with dark gray color it shows the milestones for that day. ADD Meeting:In order to add an event, click on the Date you desire to have an event and then click on the Add Meeting link. Then click again on the Date you desire the meeting so that the color changes to blue for that date. Select the Project from the Project drop down, type the Description in the description text box. You can also enter Notes in the note text box if desired. Click on the Inform by email link to open the email window. Select the check boxes next to Employee names and click the select for email button. This will send email to the selected employees. Click the save event button to save the event in the calendar. |


